Search for a nail art pen and you’ll get three very different tools under the same name. One draws lines with ink. One has a rubbery silicone tip for pushing wet gel around. One carries a tiny carved silicone head that works like a stamp. They don’t share a technique, and most of the frustration people describe (“it smudged”, “it didn’t transfer”, “it just moved the gel”) comes from using one type as if it were another.
This guide sorts them out first, then walks through technique, top coat, curing and the problems that actually show up on gel and BIAB nails.
The short answer: A nail art pen is either an ink or paint pen for drawing details, a silicone-tipped tool for shaping uncured gel, or a silicone stamping pen that transfers a design. Ink pens work on cured gel and BIAB if the surface is prepped and the ink is fully dry before top coat. In a gel manicure, silicone tool pens are used before curing, while the gel can still move. Stamping pens depend on surface finish, product thickness and design complexity. For beginners they’re worth it for simple details and cleanup, less so for complex designs.
Contents
- What Is a Nail Art Pen?
- How Does a Nail Art Pen Work?
- Nail Art Pen vs Nail Art Brush
- What Can You Actually Draw?
- How to Use a Nail Art Pen Step by Step
- Gel Polish, BIAB and Regular Polish
- When to Use a Nail Pen in a BIAB Manicure
- Skipping, Smudging and Flow Problems
- How Long Does Nail Pen Art Last?
- Do You Need to Cure It?
- Can You Put Top Coat Over It?
- What to Look for When Choosing One
- Mistakes That Ruin the Design
- Nail Art Pens for Kids
- Are They Worth It for Beginners?
- How We Tested This
- FAQ
What Is a Nail Art Pen?
It’s a hand-held tool shaped like a pen, designed for detail work that’s awkward with a full-size polish brush.
Ink and paint pens
These hold liquid colour in a barrel and release it through a fine fibre tip or a thin brush tip. Some are water or acrylic-paint based and air-dry. Others contain gel and need a lamp. They add colour, so they’re the closest thing to a drawing pen.
Silicone tool pens
Double-ended sticks with soft silicone heads: pointed, chisel, curved, cone. They carry no colour. You use them on uncured gel to push, scrape and move product. Sold as nail art tools, they often end up doing cleanup work instead.
Silicone stamping pens
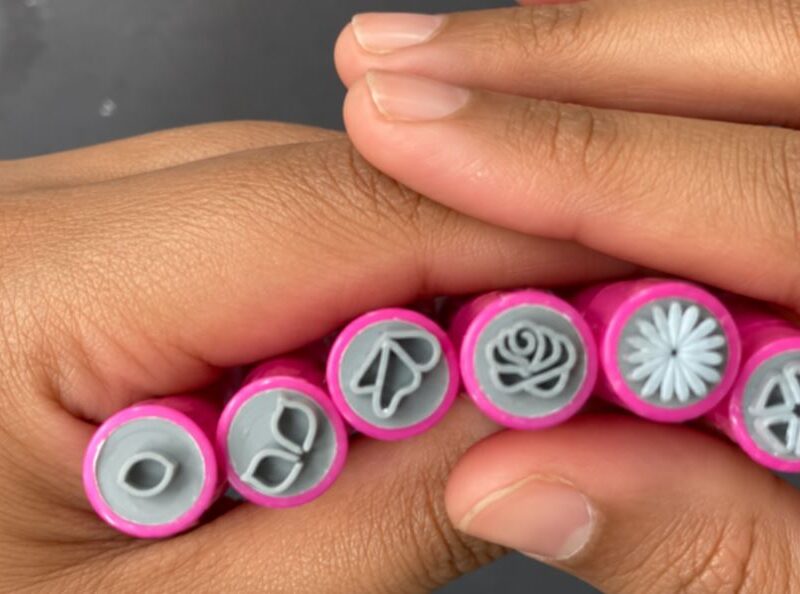
A pen body with a carved silicone head holding a small motif, such as a petal, a heart or a leaf. You load product onto the head (or onto a palette first) and press or roll it onto the nail. It’s stamping without a plate.
How Does a Nail Art Pen Work?
Many fibre-tip nail pens rely on capillary flow, while pump-style paint markers use a valve to feed colour into the tip. Flow depends on how much pigment has settled, how dry the tip is and how porous the surface is. A glossy cured gel surface isn’t porous at all, which is why ink can bead or skip on it.
Silicone tool pens don’t hold product. The flexible tip pushes material ahead of it, like a tiny spatula. That flex matters more than you’d expect. When we tested a set with several tip shapes, the softest tip bent too much to clear gel cleanly from the cuticle line. A slightly firmer tip gave far better control. Pushing gel forward was also easier than dragging it back, because the tip folds when you pull.
Stamping pens rely on contact. The design only transfers where the silicone head actually touches the nail, which brings curvature, pressure and surface finish into play.
Nail Art Pen vs Nail Art Brush: What’s the Difference?
| Ink / paint pen | Silicone tool pen | Stamping pen | Detail brush | |
|---|---|---|---|---|
| Carries colour | Yes, built in | No | Loaded each time | Loaded each time |
| Works on cured surface | Yes | No | Yes | Yes |
| Best at | Dots, outlines, lettering | Cleanup, shaping, marbling | Repeating one small motif | Fine lines, blends, custom work |
| Learning curve | Low | Low to medium | Medium, lots of retries | High |
| Line control | Fixed on rigid tips; some variation with brush tips | Defined by removal | Fixed by design | Fully adjustable |
A brush absorbs product into its bristles and releases it as you stroke. Silicone doesn’t absorb. It pushes and scrapes. That one difference explains why silicone tools are poor at painting a line but good at shaping one.
What Can You Actually Draw With a Nail Art Pen?
With an ink pen: dots, outlines around a gel shape, simple florals, French tip edges, hearts, small lettering, abstract squiggles and line-art faces. On fixed-tip pens the line width barely changes with pressure, so thin-to-thick strokes (the kind that make a flower petal look alive) are hard.
With a silicone tool pen, the design comes from taking gel away. Lay down a strip of colour, then scoop out sections to leave a clean line behind. That’s negative-space art, and it’s often neater than trying to paint the same line freehand. Silicone tools also handle dry-marble swirls: drop two or three uncured colours next to each other and drag the tip through them.
With a stamping pen: the motif on the head, and not much else. Single petals and simple shapes transfer most reliably. Designs made of several separate elements tend to come out with missing or blurred sections.
How to Use a Nail Art Pen Step by Step
Ink or paint pen on cured gel
- Finish and cure your base colour. If your gel leaves a sticky inhibition layer, wipe it with alcohol. Ink drags and bleeds in that layer.
- Give the ink something to grip. A very glossy no-wipe surface can make ink bead. A light buff or a matte top coat underneath helps it sit flat. The same light-buff principle is covered in our nail prep guide.
- Prime the pen on a palette until colour flows evenly. Never test on the nail.
- Draw with light pressure, holding the pen upright. Pressing hard splays fibre tips and floods paint markers.
- Let it dry completely. Air-dry inks need time; gel-based pens need a cure. Rushing this is a common cause of smudging.
- Seal with top coat using the float technique described in the top coat section.
Silicone tool pen on uncured gel
- Apply gel and don’t cure it. These tools only work while product can still move.
- Pick the tip for the job: narrow for cuticle and sidewall cleanup, chisel for straight edges and scraping, curved for smile lines.
- Push, don’t pull. Move gel ahead of the tip. Dragging it backward folds the silicone and leaves ridges.
- Keep the tip in contact while you move product. Lifting and re-landing repeatedly can fold air into thick gel.
- Wipe the tip between passes, then cure.
Silicone stamping pen
- Take the shine off the cured surface with a light buff. Gloss can make transfer from a silicone pen head harder.
- Load a thin, even layer of product on the head or palette.
- Roll, don’t press. Rock the head across the nail from one side to the other so every part of the design meets the curve.
- Clean the head between attempts. Leftover product ruins the next transfer. We cleaned the silicone head on our pen with acetone; check the maker’s instructions for yours.
- Cure or dry, depending on the product. Gel polish or gel liner used for stamping needs curing; air-dry stamping polish needs drying time. Then top coat.
Do Nail Art Pens Work on Gel Polish, BIAB, and Regular Polish?
Cured gel and BIAB: yes, for ink pens and stamping pens, as long as the inhibition layer is dealt with and the surface isn’t slick. BIAB behaves like any cured gel surface here. The builder layer underneath doesn’t change how ink sits on top.
Uncured gel and BIAB: this is silicone tool territory. Thick builder gel is actually where these tools make the most sense. A thin coat of soak-off colour barely needs manipulating, but a heavier builder or hard gel layer can be pushed, levelled and cleaned up with a silicone tip before curing. The same applies to sculpted work like 3D gummy nails, where thick clear gel has to hold its shape before it goes under the lamp.
Regular polish: ink pens work once the polish is fully dry, which takes longer than it feels. The risk is at the top coat stage. Regular top coat contains solvents that can soften some inks and pull them across the nail.
If you work with acrylic, silicone tool pens also push acrylic into place and refine edges, including reverse smile lines. Acrylic moves differently from wet gel, and some tip shapes may suit it better.
When Should You Use a Nail Pen in a BIAB Manicure?
There are two windows, and they use different pens.
Before curing the BIAB layer, reach for a silicone tool. Run a narrow tip along the cuticle line and sidewalls to clear any product that flooded the skin. For beginners who regularly flood the cuticle, this may be the most useful thing the tool does, and it has nothing to do with nail art. Product touching the skin can compromise a clean seal at the cuticle edge and may contribute to lifting, especially at the sidewalls. It also matters for your skin: acrylate monomers in uncured gel are the sensitising form, while fully cured polymer is considered inert.
After the colour layer is cured and wiped, reach for an ink or stamping pen. Let air-dry ink dry fully; cure gel-based ink, or gel used for stamping, as its label directs. Then finish with top coat. Don’t draw directly onto the structure layer if you plan to add colour on top. Keep the art as the last layer under the top coat.
If lifting at the cuticle keeps coming back even with clean application, our guide on how to stop builder gel lifting goes through the causes by zone.
Why Does My Nail Art Pen Skip, Smudge, or Stop Flowing?
Skipping
The surface is too glossy or still tacky, or the pigment has settled. Shake and prime the pen, wipe the inhibition layer, and buff lightly if the no-wipe finish is very slick.
Smudging
Usually the ink wasn’t dry, or the top coat brush dragged it. Wait longer than you think you need to, then float the top coat (see below). Some water-based inks also stay soluble in certain top coats, so a test on a spare tip is worth the two minutes.
Stopped flowing
A dry or clogged tip. Store pens horizontally or tip-down as the maker directs, cap them straight away, and wipe gel residue off the tip before it hardens there.
Stamping pen won’t transfer cleanly
In our testing, some designs looked sharp on a flat palette and then lost definition on a real nail tip. The flat test is overly optimistic because a nail is curved. The head only makes full contact where the surfaces meet, and the edges of the design lift off.
Rolling the head across the nail gave us noticeably more complete transfers than pressing straight down. Pressure is the other half. Silicone flexes, so pressing too hard distorts the design and pressing too lightly leaves gaps.
Product thickness is less predictable than you might assume. We stamped with four white products: a regular white gel polish, a white gel liner, Born Pretty paint gel (a thick, paste-like gel) and Born Pretty white stamping polish. The Born Pretty paint gel didn’t consistently beat the regular gel polish; on the petal design it gave incomplete transfers and needed several repeats, and gel liner looked clean on the palette but failed to transfer a complete image on the nail in one design. Regular gel polish handled several of the simpler motifs with acceptable colour. So a dedicated stamping product isn’t always necessary for basic shapes.
Put together, three things decide whether a stamp comes out clean: the surface, the consistency of the product, and how complex the design is. Change any one and the result changes. It’s also why one person swears by a pen that someone else can’t get working.
How Long Does Nail Pen Art Last?
Mostly, that depends on the top coat protecting it. When the ink and top coat are compatible, sealed nail art can last for the life of the manicure. Unsealed ink is exposed to wear from the start. Gel-based pens that are cured behave like any other gel layer.
Do You Need to Cure a Nail Art Pen Under a UV/LED Lamp?
Only if it’s a gel pen. Check the label: gel-based art pens need curing, while water-based and acrylic-paint pens air-dry. A UV/LED lamp will not replace the air-drying time required by a non-gel pen. If you seal it with a gel top coat, that layer still needs its own cure.
Can You Put Top Coat Over a Nail Art Pen?
Yes, and you should. The question is how.
Load the top coat brush generously and let the bead of product float over the design without the bristles touching it. Two light passes beat one scrubbing pass. Cap the free edge last.
Ink and top coat pairings vary, so test first. Draw a line on a spare tip, let it dry, float your usual top coat over it, then cure it if it’s a gel top coat or let it dry if it’s a regular one. If the line blurs, try a longer dry time or a different top coat before blaming the pen.
What Should You Look for When Choosing a Nail Art Pen?
Start with the base. Water or acrylic paint for air-dry convenience, gel if you want the art to cure as part of the manicure. Tip size comes next: fine tips (roughly under 1mm) for linework, broader ones for fill. For silicone tool pens, look at firmness and shape variety. A set that includes a slightly firmer tip and a chisel shape covers more jobs than one with only soft pointed ends.
For stamping pens, judge them by the designs. In our testing, single-element motifs such as one petal transferred far more reliably than designs made of several separate parts.
Nail Art Pen Mistakes That Ruin the Design
Drawing into the tacky inhibition layer. Topping too soon. Brushing top coat back and forth over wet ink. Pressing a stamping pen straight down on a curved nail. Trusting a palette test. Pulling wet gel backward with a soft silicone tip. Using an overly soft tip for cuticle cleanup and wondering why it won’t hold a line.
Many of these overlap with the builder gel application mistakes that cause lifting: they come from rushing a layer or putting product where it doesn’t belong.
One more that gets overlooked: judging a stamping pen by one good result. What matters is whether you can get the same result on all ten nails. With the amount of retrying our stamping pen needed, a full set is where that shows most.
Nail Art Pens for Kids: What to Choose
Choose pens sold specifically for children and check the age range on the pack. Gel pens, silicone tools for wet gel, and anything that needs a UV/LED lamp are designed for adult use. Acrylate allergy from nail cosmetics is reported in consumers as well as professionals, and repeated exposure or improper curing is linked to it.
Supervise younger children, keep product off skin where possible, and remove it the way the label describes.
Are Nail Art Pens Worth It for Beginners?
An ink pen is worth it for anyone who wants dots, outlines and small details without learning brush control first. It’s cheap, forgiving and quick.
A silicone tool pen is worth it for a different reason than the packaging suggests. Its best job may be cleaning up the cuticle and sidewalls before curing, especially with BIAB and builder gel. Used that way, it behaves more like a miniature sculpting tool than an art tool.
A stamping pen is the hardest to recommend. It can produce a usable design, but getting that result repeatedly takes practice and some luck with product and surface. In our tests, repeating a clean transfer took a lot of trial and error. We didn’t test plates or decals side by side, but given that repeatability problem, we’d lean toward them for a full set of ten nails.
So: ink pens add. Silicone tools move and remove. Stamping pens transfer. Choose based on what you want to do to the nail, not on the name on the box.
How We Tested This
We used a silicone tool set with several head shapes (pointed, chisel, curved) on uncured gel, focusing on cuticle and sidewall cleanup, smile lines, redistributing thick gel and marbling. We also tried the same tools with acrylic.
The test was carried out on 12 September 2026. For the stamping pen, we lightly buffed cured top coat to remove the shine, then stamped designs on a flat palette and on a curved nail tip. Products used were a regular white gel polish, a white gel liner, Born Pretty paint gel and Born Pretty white stamping polish. We used both simple single-element motifs and multi-element designs, and compared pressing straight down with rolling the head across the nail. The silicone head was cleaned with acetone between attempts.
Designs were repeated when the first transfer was incomplete, so the number of attempts varied by design. The first design, for example, didn’t transfer on the first try and worked on the second, and the rose design was stamped a second time after the first attempt.
What we looked at: how complete the transfer was, line clarity, how easy cleanup was, and whether a result could be repeated. Observations about silicone tools and stamping pens in this guide come from this testing. Guidance on ink pens is general and not based on our own test.
Nail Art Pen FAQ
Can I use a nail art pen on BIAB?
Yes. Use an ink or stamping pen on the cured, wiped surface. Let air-dry ink dry fully, and cure gel-based ink or any gel polish used for stamping as its label directs, then seal with a gel top coat. A silicone tool pen is used earlier, on the BIAB layer before curing.
Why does my nail pen smudge under top coat?
Usually because the ink wasn’t fully dry or the top coat brush dragged across it. Allow more drying time and float the top coat over the design without the bristles touching it.
Do nail art pens need a UV lamp?
Only gel-based pens. Water-based and acrylic-paint pens air-dry. The top coat over them still needs curing if it’s a gel top coat.
What is a silicone nail pen used for?
Moving and removing uncured gel: cleaning the cuticle and sidewalls, shaping smile lines, levelling thick builder gel, creating negative-space lines and marbling. It doesn’t add colour.
Why won’t my stamping pen transfer the full design?
The nail is curved, so a straight press misses the edges. Roll the head across the nail, reduce gloss with a light buff, use a thin even layer of product and pick simpler designs.
Are nail art pens safe for kids?
Choose pens sold specifically for children, check the age range on the pack, and supervise use. Gel pens and anything requiring a UV/LED lamp are not children’s products.