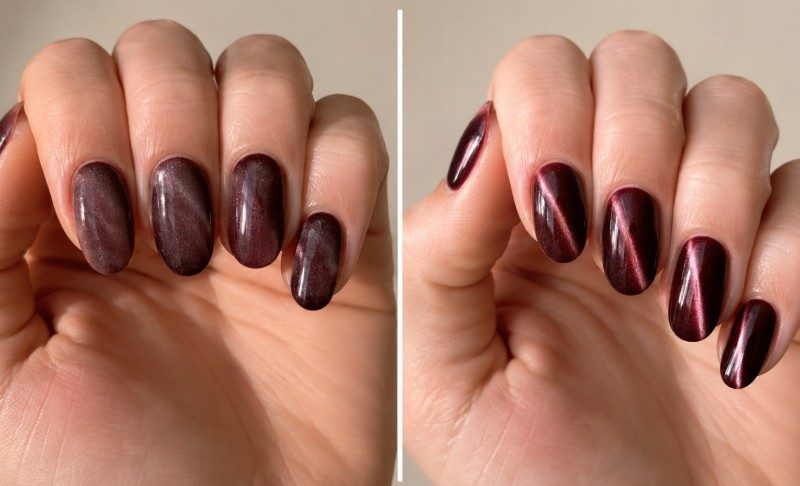
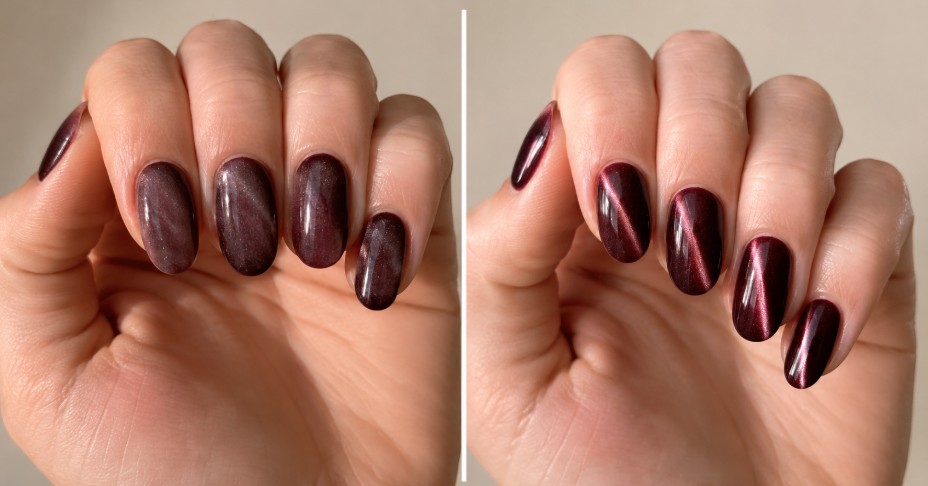
You bought the polish. You bought the magnet. You held it over the nail like every video showed you, and what you got was a dull, slightly streaky finish with a vague shimmer running through it — nothing like the sharp, liquid ribbon of light you were promised. Almost everyone who tries cat eye nails at home hits this wall at least once, and the frustrating part is that the fix is rarely the thing you assume it is.
Here’s the thing worth understanding before you buy a stronger magnet: cat eye polish is not a colour with a trick attached. It’s a suspension of magnetic particles sitting in a gel base, and the effect happens because those particles physically move. Once you think of it as a wet, moving material rather than a finish you apply, most of the failures explain themselves.
Cat eye nails usually fail for one of four reasons: the magnetic layer is too thin or uneven, the base colour does not suit the effect you are trying to create, the magnet is held too far away or for too short a time, or too much time passes between magnetising and curing.
One common reason is an overly thin or uneven magnetic layer. In some formulas, a dragged-out coat can make it harder for the magnetic pigment to redistribute into a clearly defined pattern.
What Is Actually Happening Inside the Polish
Cat eye gel contains fine magnetically responsive pigment, often iron-based, dispersed through a gel medium. Straight out of the bottle, those particles sit at random orientations, which is why an uncured coat looks like a plain shimmer.
Bring a magnet close and those particles reorganise. They align along the magnetic field lines and concentrate differently across the nail. Because each particle is reflective and now sits at a controlled orientation rather than a random one, different areas of the surface throw light back at different angles. The bright ribbon and the darker zones on either side of it are the same pigment behaving differently, not more pigment in one place and less in another.
This is why the effect is a genuinely optical one and why it shifts as you move your hand. The particles are acting like thousands of tiny angled mirrors, and the magnet decides which way they point.
This is why the strength of your magnet is usually the last thing to blame and the first thing people replace. A magnet can only reorganise particles that are free to move.
Reason One: The Magnetic Layer Is Too Thin or Uneven
One common reason for a weak cat eye is an overly thin or patchy magnetic layer. Most of us are trained — correctly — to apply gel in thin, controlled coats. That habit is excellent for base coats and standard colour, and it can work against you here.
In a very thin or uneven coat, the magnetic pigment may have less room to redistribute cleanly, which can leave the effect looking faint or patchy rather than forming a defined line.
The ideal thickness varies by formula, so this isn’t a case of “thicker is always better” — an over-loaded coat brings its own problems, from flooded sidewalls to incomplete curing. Aim for an even, medium coat with enough product to self-level on its own rather than one you have to spread with the brush. If you can see brush strokes sitting in the gel, you’re likely on the thin side.
The practical test: apply your cat eye coat, then tilt the nail slightly. If the gel visibly self-levels and settles flat within a second or two, you have enough product. If the surface stays exactly where your brush left it, add a little more before you touch a magnet to it.
There is a second layer to this. Many cat eye gels are semi-sheer, and two coats are commonly used to build colour depth — colour with the first, cure it, then apply the second and magnetise only that one. Some products are formulated for a single coat or used over a specific base system, so check what your gel’s instructions call for.
Reason Two: The Base Underneath Changes the Result
Base colour changes the character of the effect rather than following one universal rule, and this is where a lot of contradictory advice circulates.
Dark and black bases usually give magnetic shimmer stronger contrast, which is exactly why black is such a widely used cat eye base — a silver or pale magnetic pigment over black produces a very sharp, high-drama ribbon. Nude, jelly, and lighter bases go the other way, softening the effect into something tonal and subtle. Neither is wrong; they’re different looks. What causes disappointment is expecting a dramatic ribbon from a soft pairing, or the reverse.
Because the interaction depends on your specific gel’s pigment colour and density, swatch the combination before committing to all ten nails. A tip stick costs nothing and saves a full removal.
The other base issue is the surface itself. An uneven or improperly cured base can affect how evenly the magnetic layer sits, and a layer that sits unevenly gives an uneven ribbon — wobbly, or broken in the middle. This is the same category of problem behind a lot of general application faults: the surface you build on decides what the layer above can do. Our guide to nail prep for beginners covers getting that foundation flat and consistent.
Worth checking: if your cat eye ribbon looks fine on some fingers and vanishes on others, look at the base coat rather than your magnet technique. Uneven base thickness across the hand is one possible explanation, alongside magnet position, the amount of product applied, and differences in nail curvature.
Reason Three: Magnet Distance, Angle, and Time
Magnetic field strength drops steeply with distance. Not gradually — steeply. A magnet held two millimetres above the nail is doing dramatically more work than one held at six or seven millimetres — a gap that is easy to leave when you’re trying not to touch the wet gel.
The instinct is to hover safely because touching wet gel with a magnet ruins the coat, and that instinct is right. But “safe” usually becomes “too far.” Aim to get as close as you possibly can without contact. Resting the side of your hand on the table to steady it makes a visible difference, because a drifting magnet blurs the line.
Time matters too. Many cat eye gel instructions recommend holding the magnet in place for around 10–15 seconds, although the ideal time varies by formula and magnet strength. A quick two- or three-second pass may not give the particles enough time to form a clearly defined pattern.
Angle is the variable almost nobody adjusts. A magnet held flat and parallel to the nail gives a straight ribbon across the middle. Tilt it slightly and the line shifts and curves. Hold it at the cuticle end and angle it down toward the free edge and you get the deep, curved sweep that reads as high-end salon work. If your line is always in the same boring spot, the angle is why. Choosing a magnet with a usable shape helps here, which is what our comparison of the best cat eye nail magnets looks at in detail.
Reason Four: The Pattern Disappeared After Curing
This one feels like a betrayal. The ribbon appears perfectly under the magnet, you move to the lamp, and what comes out is flat.
Magnetic patterns can soften after the magnet is removed while the gel remains uncured, particularly in more fluid formulas. How quickly this happens varies by product, which is one of the variables compared below. The pattern is only permanent once the gel has cured around the particles and locked them in place.
So the sequence is not “magnetise, admire, cure.” It is magnetise and go straight into the lamp — one finger at a time. Doing all five and then curing the hand together is a common version of this mistake, because by the time finger five is done, finger one has been sitting uncured for a minute.
Safest default: magnetise one nail and cure it promptly before moving to the next. Some formulas may hold their pattern longer than others, but immediate curing removes that variable. The extra lamp cycles are worth it.
A weak or aging lamp compounds this, because a slow cure gives the particles more time to drift while the gel is still soft. If your gels generally take longer than the stated cure time to set firm, the lamp is worth investigating — our notes on choosing a lamp for builder gel and BIAB apply equally to magnetic gels. On the other end, a lamp that cures aggressively can create heat spikes, which is a separate issue covered in why gel burns under the lamp.
Three Setups That Explain the Main Variables
You do not need to treat 2 mm, 6 mm or 30 seconds as universal rules. They are simply useful comparison conditions for understanding how magnet distance, coat thickness and curing delay may change the result.
The three setups below show what you would generally expect based on how magnetic gels behave and on common manufacturer guidance.
- Coat
- Thin
- Distance
- 6 mm
- Delay
- 0 s
- Coat
- Medium
- Distance
- 2 mm
- Delay
- 0 s
- Coat
- Medium
- Distance
- 2 mm
- Delay
- 30 s
The important point is not that these exact numbers are correct. The 2 mm and 6 mm distances and the 30-second delay are comparison conditions, not industry standards.
Sample A also changes two things at once — coat thickness and magnet distance — so it cannot tell you which variable caused the difference. It is better understood as a deliberately less favourable setup rather than a controlled single-variable test.
The cleaner comparison is between B and C. The coat thickness and magnet distance stay the same, while only the delay before curing changes.
Compared with B, C may produce a softer ribbon if the formula begins to relax while it remains uncured. In a more viscous formula, however, the difference may be small or barely visible.
This is why prompt curing is a useful default: it removes curing delay as a variable without assuming that every formula relaxes at the same rate.
What this comparison can — and cannot — tell you
This comparison is useful for understanding the direction in which these variables tend to affect the result, but it should not be treated as a universal formula.
Different cat eye gels vary in viscosity, magnetic pigment concentration, particle size and base opacity. Different magnets also produce different field shapes and strengths.
That means a 30-second delay may visibly soften one gel and barely affect another, while a 6 mm magnet distance may be workable with one magnet and ineffective with another.
The goal is not to find one perfect number. It is to understand which variables are worth adjusting when the effect is weak, blurry or inconsistent.
Reading Your Own Result
Rather than guessing, look at what you actually got and work backwards. The specific way a cat eye fails points fairly reliably at its cause.
| What you’re seeing | Most likely cause | What to change |
|---|---|---|
| Flat shimmer, no line at all | Coat too thin, or magnet too far | Apply a fuller self-levelling coat; halve the magnet distance |
| Line visible but faint and washed out | Base and pigment aren’t giving enough contrast | Swatch the gel over a darker base and over a nude to see which suits it |
| Ribbon appears then fades in the lamp | Delay between magnet and cure | Cure one nail at a time, immediately |
| Line is broken or wavy | Uneven base surface, or magnet drifted | Even out the base; brace your hand while holding |
| Effect strong on some nails, absent on others | Inconsistent coat thickness across the hand | Standardise how much product goes on each nail |
| Ribbon sits too close to the cuticle | Magnet angle, not magnet strength | Tilt the magnet toward the free edge |
| Surface dull or textured after top coat | Magnet contacted the wet gel | Keep a hair’s gap; steady the hand on the table |
A Sequence That Works Consistently
If you want something to follow rather than diagnose, this is the order that removes most of the variables at once.
- Prep and dehydrate properly. Magnetic gel is unforgiving about adhesion because it goes on thicker than colour gel. If you’re unsure whether you need one product or two here, primer versus dehydrator settles it.
- Apply and cure your chosen base. Darker bases push the effect toward sharp contrast, lighter ones toward a soft tonal shimmer — swatch first if you haven’t used this gel before.
- First cat eye coat, thin, cured normally. No magnet on this one. It exists to build colour depth.
- Second cat eye coat, fuller. Enough to self-level. Do one nail only, then stop.
- Magnet close and steady for 10–15 seconds. One to two millimetres, braced hand, deliberate angle.
- Cure that nail immediately. Then repeat steps four through six for the next finger.
- Top coat and cure the full hand. Use a no-wipe top coat and apply it in one direction; heavy repeated brushing can dull the depth.
Cat Eye Over BIAB and Builder Gel
A lot of people want the effect on top of a structured overlay rather than on the bare nail, and this works well — with one caveat. BIAB and builder gel both leave a domed apex, and a dome does something to the ribbon that a flat nail doesn’t: it bends it. The curve can look beautiful, but it also means the line will not sit where you expect.
Follow your product’s instructions for surface preparation between layers, since gel systems differ in whether they call for buffing, a specific base, or application straight onto the cured layer. Whatever the system, an even surface across the apex matters here, because a coat that pulls thin over the highest point has less room to redistribute. If you’re layering onto BIAB for the first time, the principles in applying polish over BIAB transfer directly. For a refresher on what the overlay itself is doing structurally, what BIAB actually is is the starting point.
One structural note worth flagging: adding extra layers on top of an overlay increases total thickness at the stress point, and thicker is not automatically stronger. If your overlays have a history of coming away at the edges, sort that out before adding decorative layers — why gel nails keep lifting covers the usual suspects, and making BIAB last longer deals with retention specifically.
On lamp exposure: cat eye adds cure cycles because you’re curing nail by nail. A scoping review of UV and LED nail lamp exposure found emissions from commercial lamps are predominantly UVA and generally within safety guidelines when used correctly, though some units exceeded those limits. If repeated UVA exposure concerns you, fingerless UV-protective gloves are an optional way to reduce exposure to the hands.
Frequently Asked Questions
Can I use any magnet, like a fridge magnet?
Technically it will move the particles, but the field shape of a household magnet is broad and unfocused, so you get a vague band rather than a defined line. Purpose-made cat eye magnets have narrow, shaped fields designed to produce a tight ribbon.
Why does the effect look great wet and dull after top coat?
Usually the top coat was applied with heavy back-and-forth brushing, which can disturb the surface before it’s fully hardened. One or two directional passes with a floated brush preserves the depth.
Does cat eye gel work on short nails?
Yes, though the ribbon has less room to sweep, so a straight horizontal line across the nail usually reads better than a diagonal on a short plate. A curved sweep needs length to show its shape.
Can I redo the magnet if the pattern comes out wrong?
Only before curing. Pass the magnet again at a different angle and the particles will rearrange. Once cured, the pattern is set and the only route is a fresh coat over the top.
Is cat eye gel harder to remove than regular gel polish?
It can be, though this depends more on the product system and the total thickness of what you’ve applied than on the magnetic pigment itself. Buff the surface properly before soaking rather than extending the soak time, and follow the removal method your product specifies.
Related Reading
If your cat eye still isn’t cooperating after all this, resist buying a stronger magnet first. Apply one nail with a noticeably fuller coat than feels correct, hold the magnet almost touching, and cure that single nail straight away. That quick troubleshooting check addresses three of the variables that commonly affect the result and can help narrow down what was going wrong.