Why Builder Gel Lifts: The Complete Root Cause Guide

I’ve been working with gel nail systems for over a decade, and I can tell you with complete honesty: builder gel lifting is the complaint I hear more than anything else. From new clients who’ve never had gels before, to experienced nail technicians who’ve done everything “right” — lifting finds a way to show up.
What frustrates people most is that lifting doesn’t always follow the rules. You can prep perfectly, cap the free edge, cure for the right amount of time — and still find yourself with a corner peeling away by day four. That’s not bad luck. That’s your nail system telling you something specific. And once you know how to listen, the solution becomes obvious.
This guide covers everything I’ve learned about builder gel lifting — from the obvious prep mistakes to the structural and biological causes that even experienced technicians miss. I’ve organised it by location, by cause, and by fix. Whether you’re a DIY enthusiast or a working nail tech, you’ll leave with a clear picture of exactly what’s happening under that gel.
Builder gel lifting is almost never caused by one thing. The three root causes are: incomplete nail prep (invisible residue on the plate), gel touching skin during application, and a mismatch between the product’s flexibility and the natural nail’s flexibility. Fix all three, and lifting drops dramatically.
What Is Builder Gel Lifting — And Why It’s Not Random
Builder gel lifting is the separation of a gel nail product from the natural nail plate, creating a gap that allows air, moisture, and bacteria to enter. It is a structural failure, not a cosmetic issue — and it almost always has a specific, identifiable cause rooted in preparation, application technique, product-nail compatibility, or structural design.
The word “random” doesn’t belong in a conversation about lifting. Every lift has a reason. The challenge is that the reason isn’t always visible at the moment of application — it sometimes reveals itself days or even weeks later, which makes it easy to blame the wrong thing.
Lifting is not a product quality problem. In my experience, the same gel from the same bottle produces flawless results on one client and lifts within a week on another — because the variable is the nail, not the gel.
There’s also a health dimension that often goes unmentioned. When gel lifts and creates a gap, moisture can become trapped underneath. That warm, damp environment is ideal for bacterial or fungal growth — which is why a small lift that’s ignored can sometimes turn into a bigger problem than just an aesthetic one.
Where the Lift Starts Tells You Everything
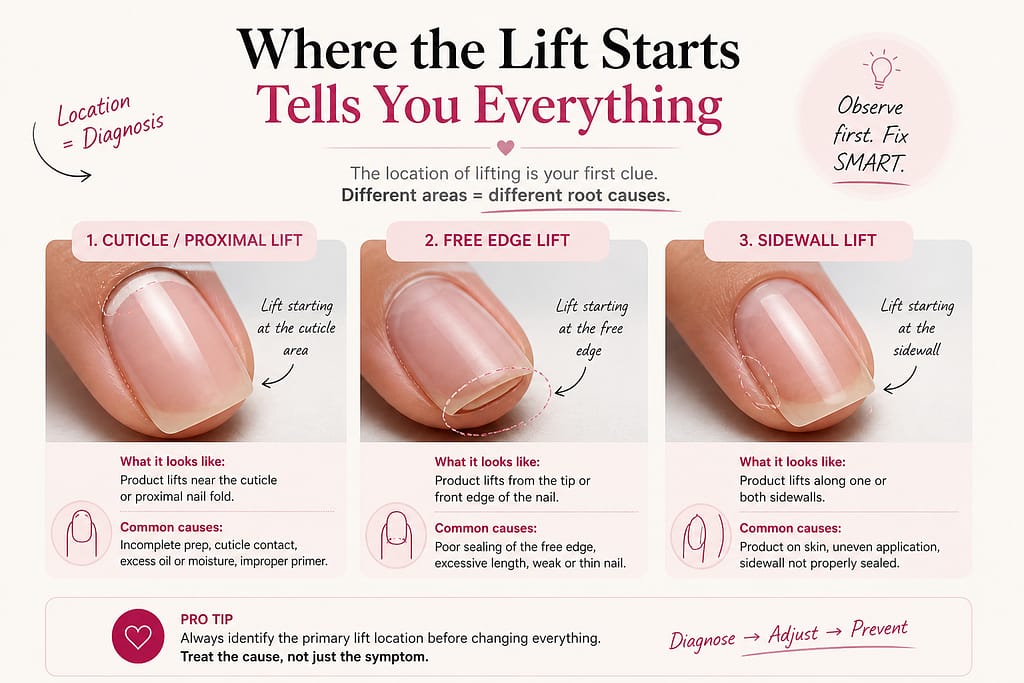
Before diving into causes, I want to share something that changed how I troubleshoot lifting: location is diagnosis. Where the gel separates tells you exactly which part of the process broke down. I started thinking of it like a map.
| Lift Location | Most Likely Cause | Primary Fix |
|---|---|---|
| Cuticle area | Residual skin on the nail plate, gel flooding the cuticle line, or touching skin during application | Thorough cuticle removal, 1mm gap at the cuticle |
| Free edge | Nail flexibility mismatch, insufficient free edge sealing, or nail bending stress | Cap the free edge every layer; switch to a more flexible formula |
| Sidewalls | Gel applied too close to the lateral folds, poor lateral sealing, or structural imbalance | Keep a clean margin at the sidewalls, check lateral product placement |
| After 2 weeks | Natural nail growth creating lever stress at the base; apex shift | Maintain fill schedule every 3–4 weeks; address apex placement |
| Even with perfect application | Biological factors — nail flexibility, oiliness, nail plate porosity | Product-nail compatibility assessment; primer for oily nail types |
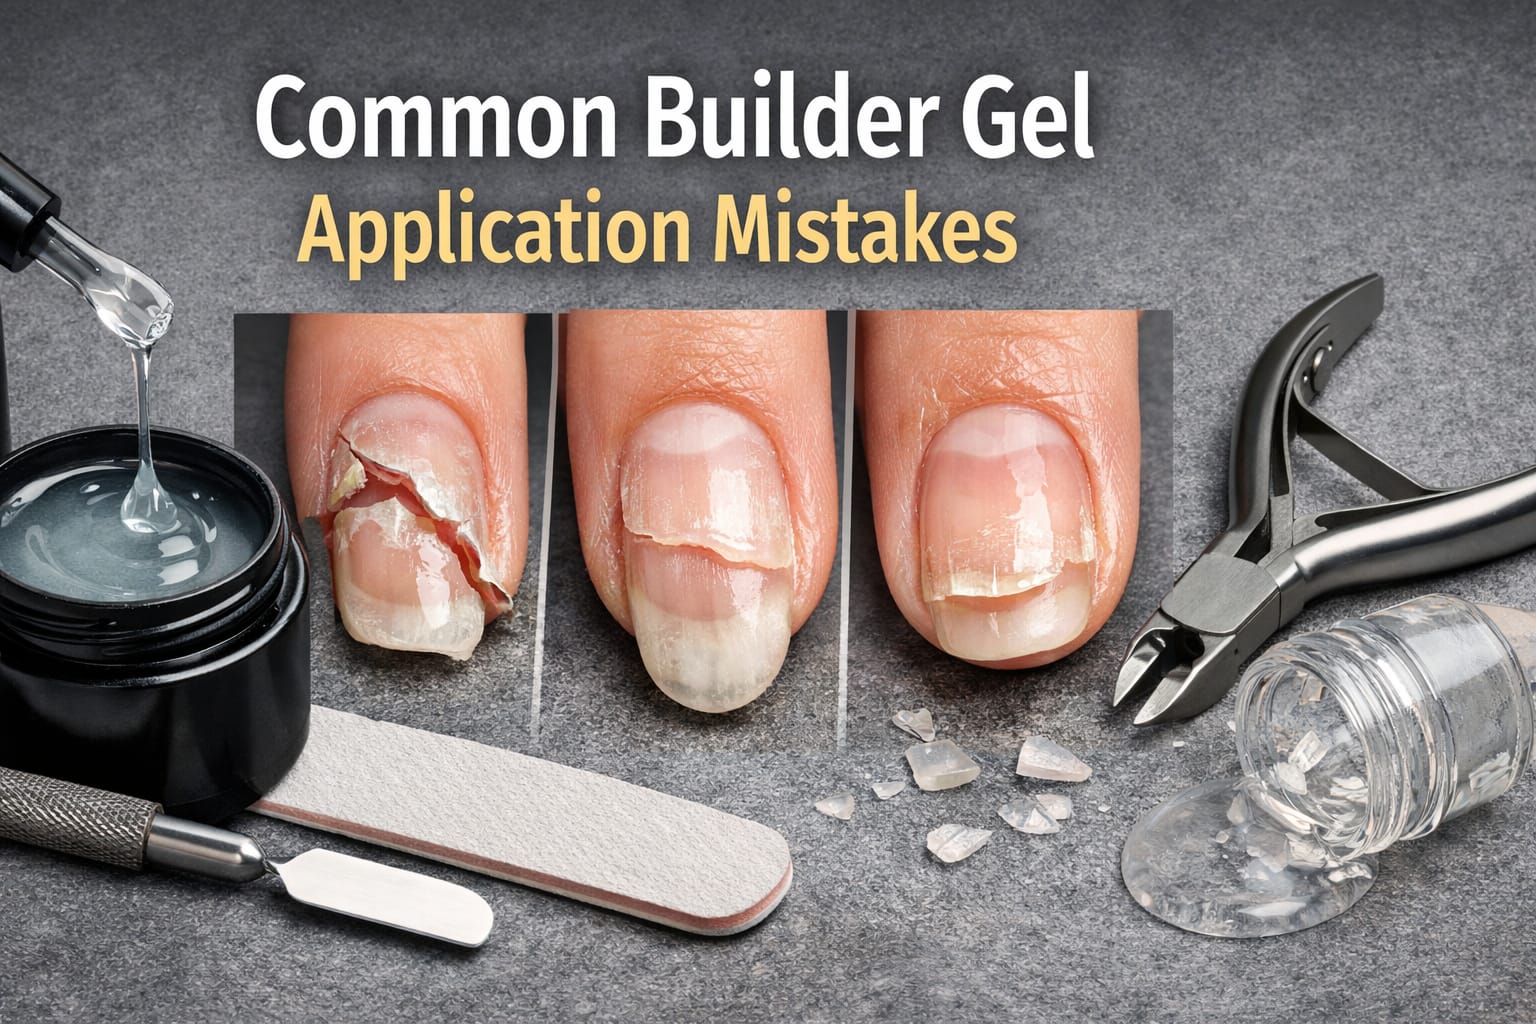
The Root Causes of Builder Gel Lifting
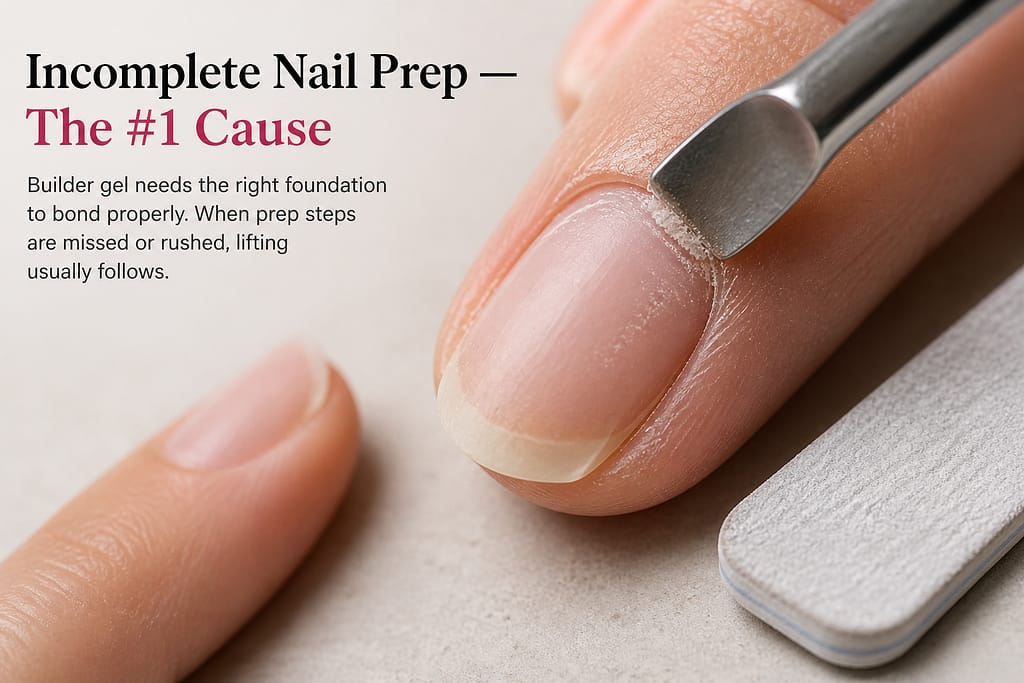
Incomplete Nail Prep — The #1 Cause
I cannot overstate this. In my years of working with gel systems, I estimate that around 70–75% of lifting cases I’ve seen trace back to the prep stage — and most of those are caused by something invisible: the thin layer of dead skin cells that remains on the nail plate even after the cuticle has been pushed back.
This dead skin, sometimes called the proximal eponychium or cuticle residue, doesn’t look like much. You can’t always feel it. But gel doesn’t bond to skin — it bonds to the nail plate. Any skin between the product and the plate creates a lifting point the moment that skin naturally sheds or moves.
I once ran two identical sets on two hands of the same client — full prep on one hand, push-back only on the other. By day six, the under-prepped hand had three nails lifting at the cuticle. The fully prepped hand looked perfect at day 18. Same gel, same lamp, same application. The only variable was cuticle removal.
The correct prep sequence matters more than most tutorials acknowledge:
- 1Cuticle removal — not just pushing
Use a cuticle remover product and a nipping tool or cuticle pusher to remove the dead tissue from the nail plate itself. Pushing back without removing the dead skin is the most common prep mistake I see.
- 2Gentle buffing — 180 grit maximum
Remove the shine from the nail plate using a 180–240 grit buffer. This creates microscopic texture for the gel to grip. Over-buffing thins the plate and creates future problems.
- 3Dust removal
Brush away all debris with a clean nail brush. Any remaining dust becomes a barrier between the gel and the plate.
- 4Dehydration
Apply a nail dehydrator or 99% isopropyl alcohol and allow it to evaporate fully. Nails are naturally oily, and that oil is the enemy of gel adhesion.
- 5Primer (if needed)
For clients with chronically oily nail plates or a history of lifting, an acid-free primer can significantly improve retention. Don’t use primer as a default — use it as a targeted solution.
“I watched three YouTube tutorials on BIAB and thought I knew how to prep. Emma pointed out I wasn’t actually removing the dead skin — just pushing it. Once I started doing proper cuticle removal, my sets started lasting three weeks easily.”
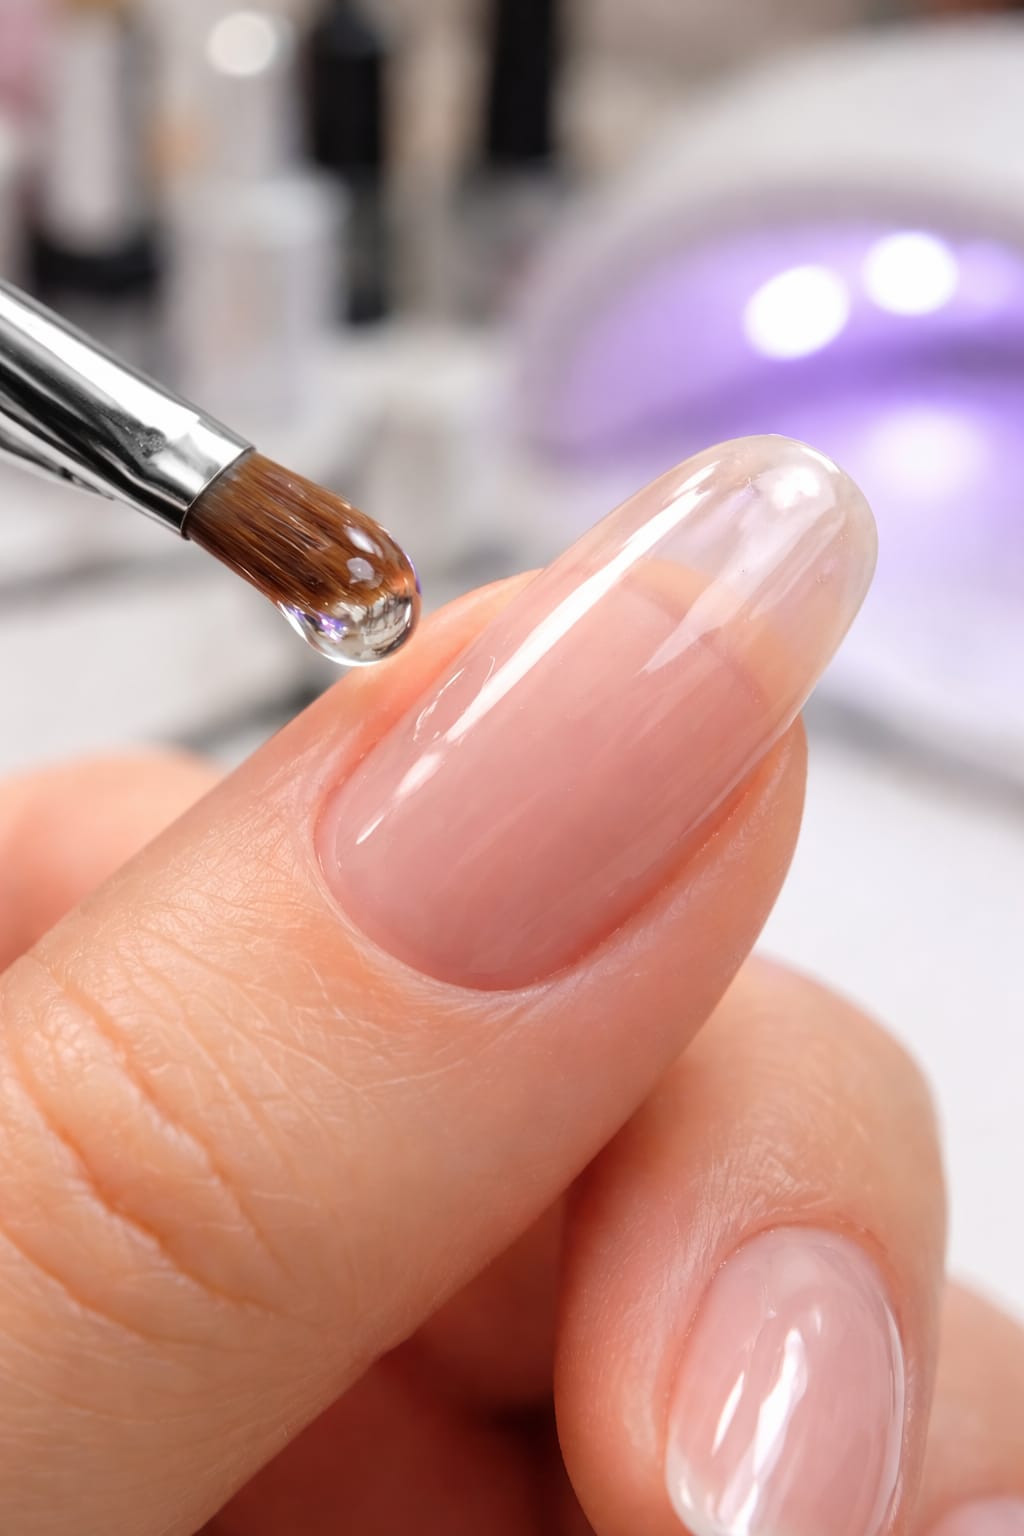
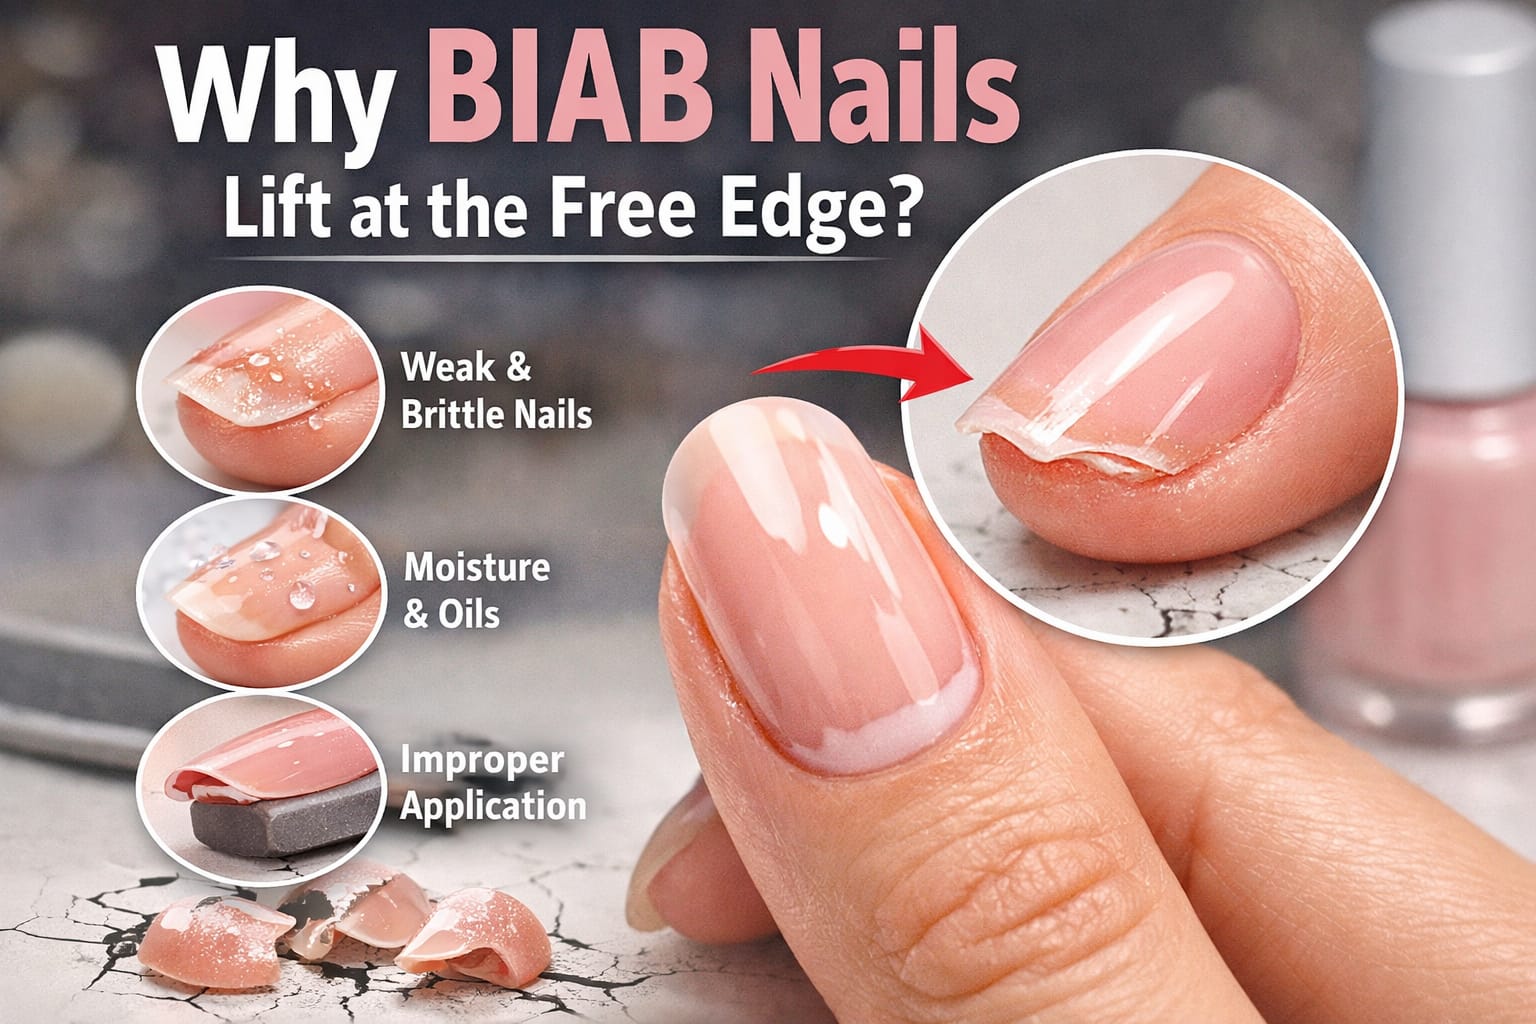
Gel Touching Skin During Application
This is the other half of the prep equation, and it’s 100% application-related. Gel bonds to the nail plate. It does not bond to skin. The moment uncured gel makes contact with the cuticle, sidewall skin, or the lateral fold, you’ve created a guaranteed lift point — it’s just a matter of when.
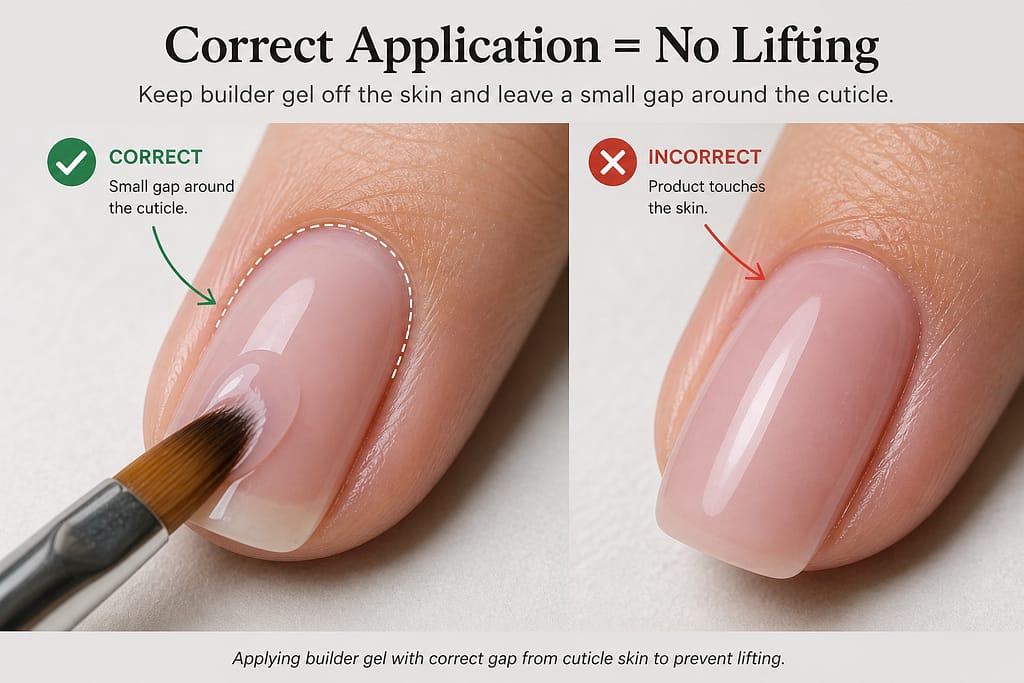
Gel that touches skin before curing will lift. No exception. Even a micro-flood that you can barely see will create a release point as the skin sheds and moves naturally. The standard recommendation is to leave approximately a 1mm margin — about the thickness of a credit card — around all edges.
The tricky part is that the skin contact might not be obvious during application. It can happen when the bead of gel flows slightly toward the cuticle as you manipulate it, or when a client moves their hand. This is why the “flood check” — looking at the nail from the side before curing — is a non-negotiable step I do on every single nail.
Product-Nail Flexibility Mismatch
This is the cause that surprises people the most — and it’s the one that explains lifting “even when everything was done right.”
Natural nails vary significantly in flexibility. Some nail plates are firm and rigid; others flex visibly under pressure. Builder gels also vary in their elasticity. When a rigid gel is applied to a flexible nail, the two materials move differently under stress — and that mechanical difference creates shear force at the adhesion layer, which eventually breaks the bond.
I had a client — a teacher who uses her hands constantly — whose nails would lift at the free edge every single time, despite perfect prep and application. We switched from a rigid builder gel to a more flexible BIAB formula, and the lifting stopped. Same technique. Same prep. Different product. The nails just needed something that would move with them rather than resist.
“I kept getting told my lifting was because of my prep. But I’d watched the same tutorial fifteen times. Turns out my nails are naturally bendy, and the gel I was using was too stiff for them. Switching to BIAB changed everything for me.”
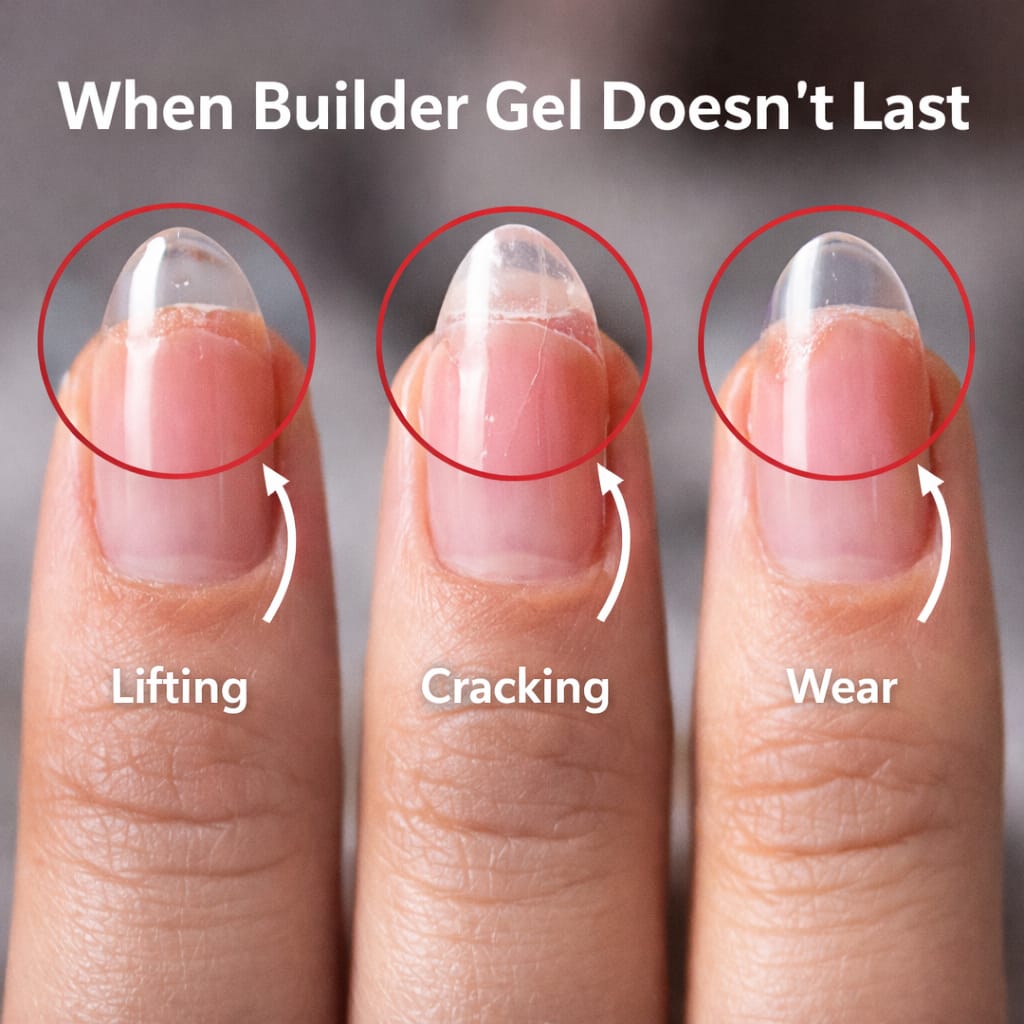
Incorrect or Insufficient Curing
Under-curing is lifting in slow motion. When gel isn’t fully polymerised, it remains slightly pliable and its adhesion to the nail plate is compromised. The lift might not appear immediately — but the bond was never fully formed.
Thumbs are the most commonly under-cured nails in any set. Their angle in most lamps means they receive less UV energy than the other four fingers. I cure thumbs separately, for an additional 30–60 seconds, on every single client. It eliminated a huge number of thumb-specific lifting complaints in my practice.
Lamp wattage and bulb condition matter more than most people realise. A 48-watt LED lamp that’s two years old may be delivering significantly less output than it was when new. If you’ve been using the same lamp for a long time and suddenly seeing more lifting, the lamp is worth investigating before blaming the gel or the prep.
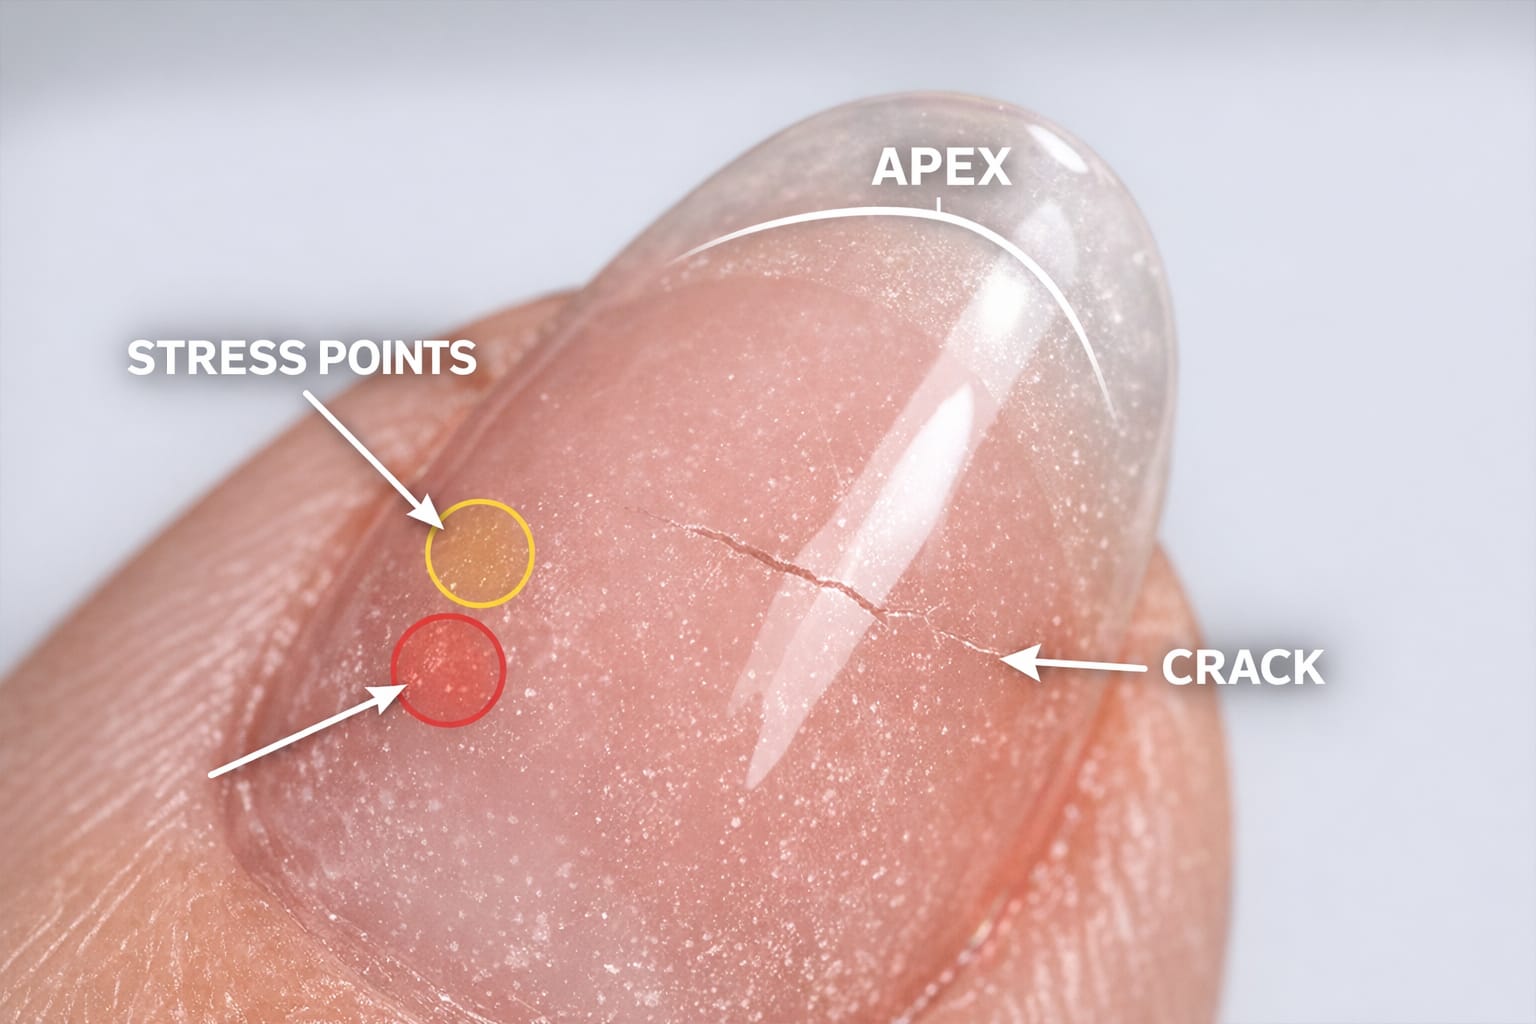
Structural Problems — The Missing Apex
Lifting isn’t always about adhesion. Sometimes it’s about how stress is distributed across the nail. This is where the apex becomes critical — and where a lot of intermediate-level nail enthusiasts hit a wall.
The apex is the highest point of the builder gel application, placed at the stress point of the nail rather than at the geometric center. A correctly placed apex distributes the mechanical forces that the nail experiences during daily activity — typing, gripping, opening things — away from the adhesion layer and toward the strongest point of the structure.
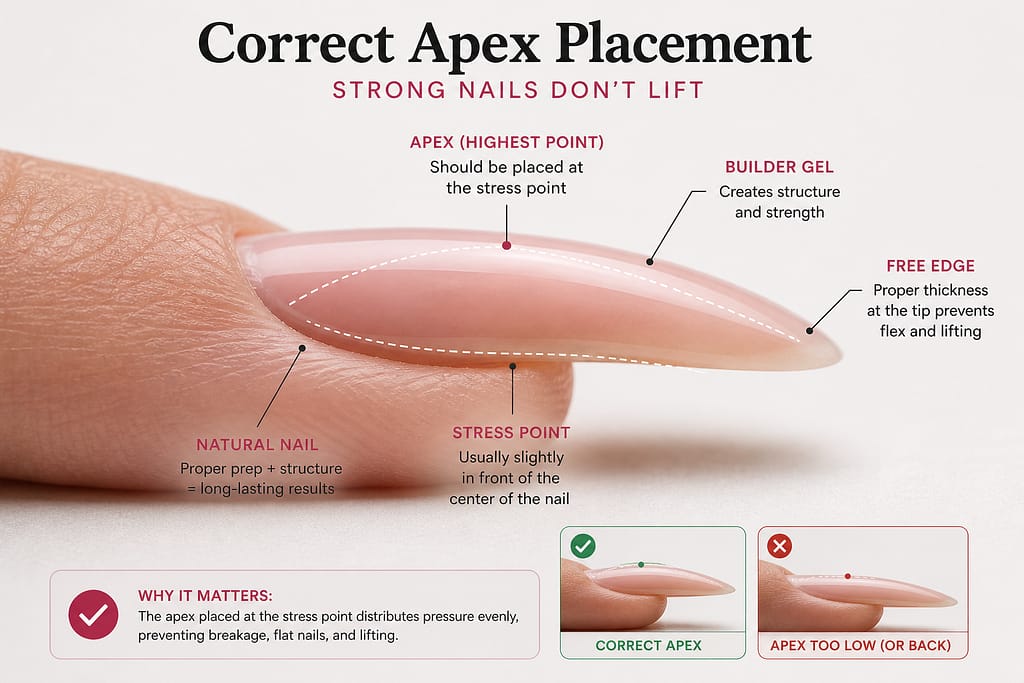
A flat application with no real apex concentrates all of that stress at the edges, which is exactly where lifting tends to start. A well-built apex doesn’t just look good — it’s structural engineering at a tiny scale.
The most common apex mistake I see isn’t placing it in the wrong spot — it’s not building it high enough. Many DIY applications look slightly domed but are essentially flat when viewed from the side. A real apex should be noticeably higher than the surrounding surface. If you’re not sure yours is high enough, it probably isn’t.
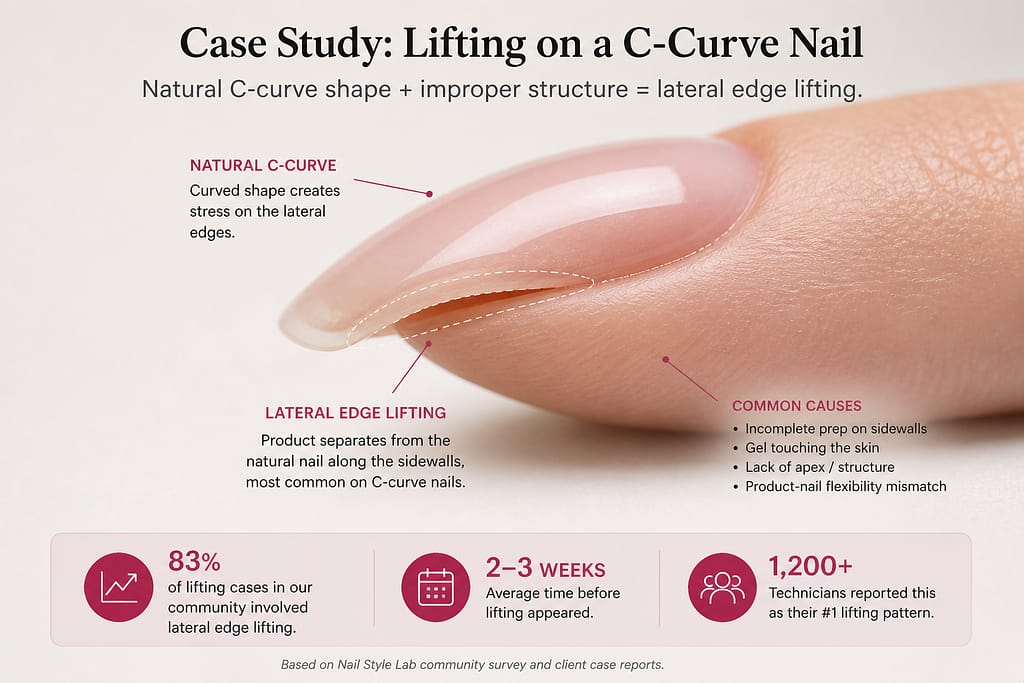
Case Study: The Chronic Lifter
A 31-year-old client who had seen four different nail technicians in eight months
She came to me convinced she was “just not a gel person.” Every set had lifted within a week, always starting at the cuticle on her ring and middle fingers.
What I found: Her nail plates curved significantly at the lateral edges (a C-curve), making cuticle removal at the sides very difficult. Previous technicians had prepared the centre of the nail well but missed the curved edges entirely — leaving dead skin in the corners. Additionally, her nail plate was unusually thin, which meant even standard buffing was over-buffing for her.
What I changed: Gentler buffing, cuticle remover left on for an additional 30 seconds, careful attention to the lateral corners, and a switch to a flexible BIAB formula. No primer — her nails weren’t oily, they just needed gentler prep.
Result: Her last four sets lasted 3 weeks or more without a single lift.
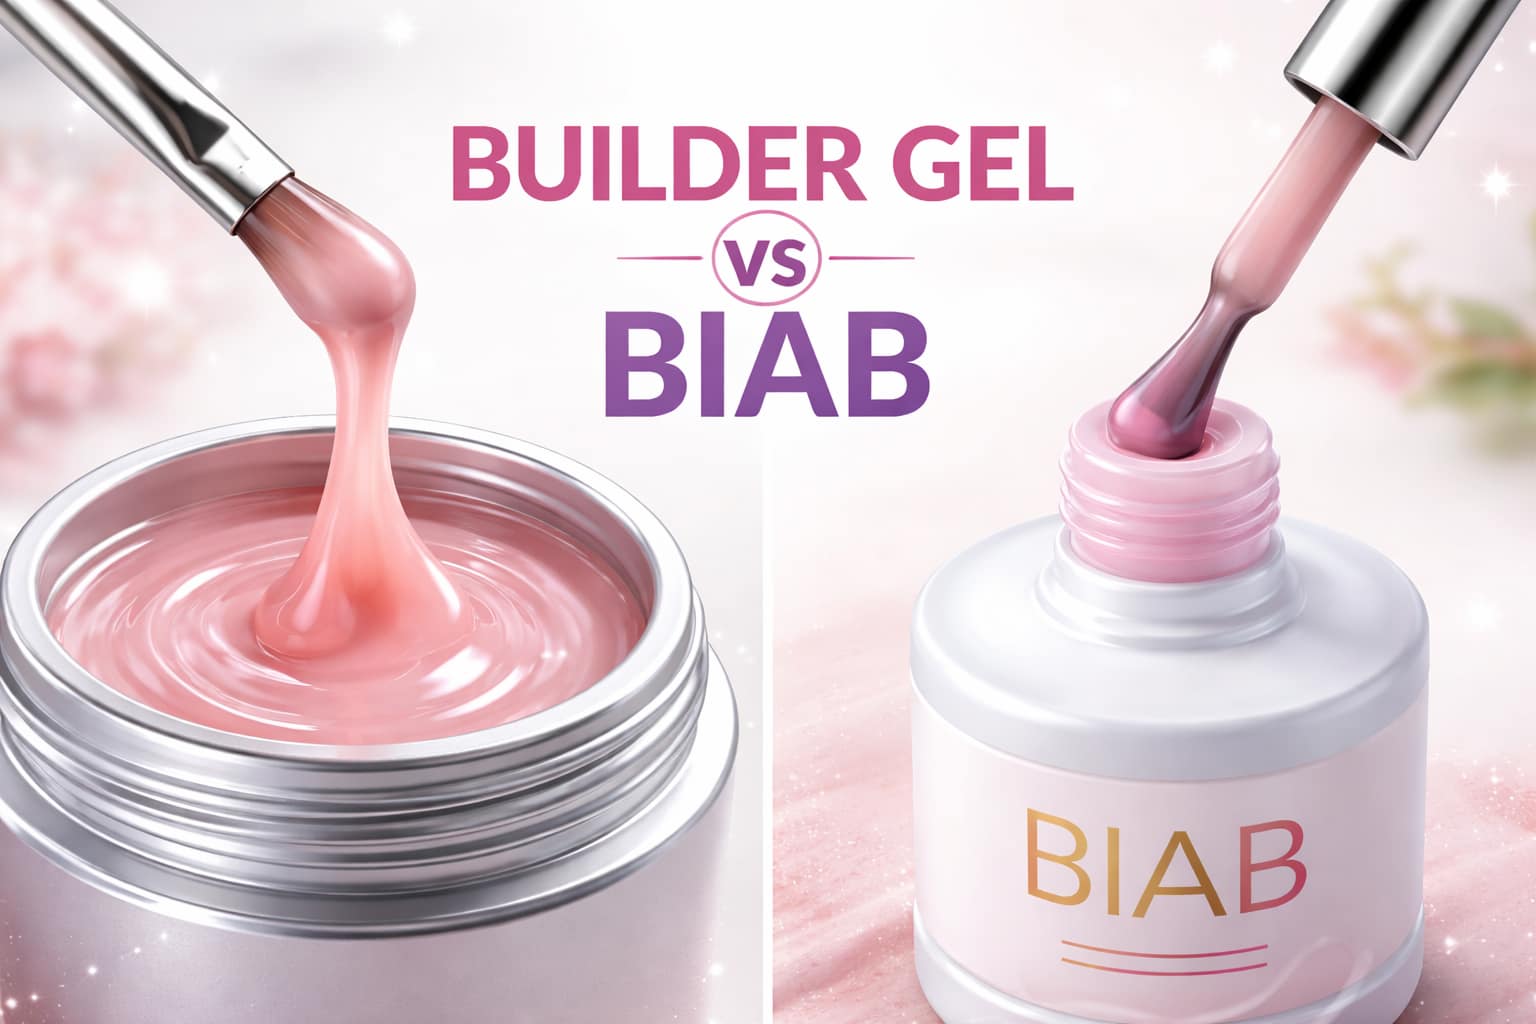
Does BIAB Lift Differently Than Builder Gel?
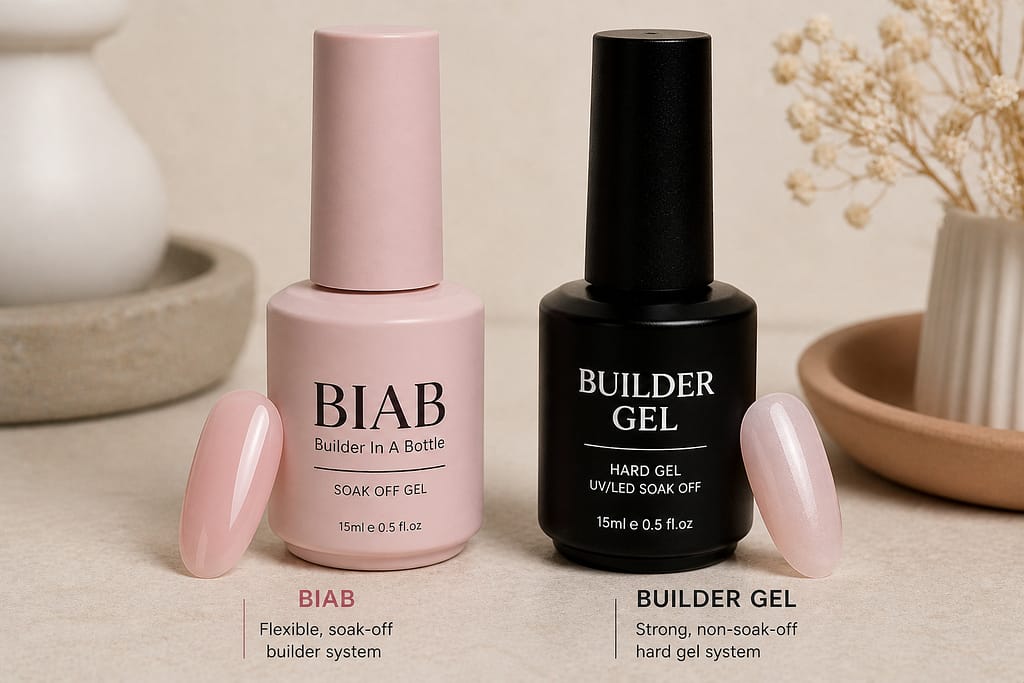
Yes — and understanding the difference matters when you’re trying to troubleshoot. BIAB and traditional builder gel have different failure modes because they have different physical properties.
BIAB is designed to be more flexible than traditional builder gel. That flexibility is its strength — it moves with the natural nail rather than resisting it. But it also means the free edge, where the nail flexes the most, is a more common lifting point for BIAB than for rigid builder gel.
Traditional builder gel is stiffer. It holds its shape under stress better, which makes it ideal for extensions. But that rigidity becomes a problem on flexible natural nails — the nail moves, the gel doesn’t, and the adhesion breaks.
If your nails are soft and bendy, BIAB is usually the better choice. If you have firm nail plates and want to add length, a more structured builder gel will likely serve you better. Neither is universally superior — the correct answer depends on your nail biology.
How to Stop Builder Gel Lifting: A Systematic Approach
Rather than a checklist of tips, I want to give you a framework — a way of thinking about lifting that lets you identify the right fix for your specific situation.
Step 1: Identify the Location
Where does the lift start? Cuticle, free edge, sidewalls, or after a delay? Use the location map earlier in this guide to identify the most likely cause before changing anything.
Step 2: Rule Out Prep Before Anything Else
Even if you think your prep is good, rule it out. Ask yourself honestly: are you removing the dead skin from the nail plate, or just pushing the cuticle? Are you dehydrating properly? Is there any oil on the plate at the moment you apply the gel?
Step 3: Examine Your Application
Is the gel touching skin? Look at each nail from the side before curing. Is the free edge being capped on every single layer? A missed seal at the free edge on even one layer can cause lifting later.
Step 4: Assess Curing
When did you last clean your lamp? How old is it? Are you curing thumbs separately? Try adding 30 seconds to your cure time on a test set and see if retention improves.
Step 5: Consider Product-Nail Compatibility
If you’ve ruled out prep, application, and curing — it’s the product. Try a more flexible formula if your nails are bendy. Try a more structured formula if you’re seeing cracking rather than lifting. The product should suit the nail, not the other way around.
For clients who lift chronically regardless of prep, I add one thing: a thin layer of a protein-based bonder before the gel application. This creates an additional adhesion point for the gel without altering the prep process. It’s not a substitute for good prep — but on difficult nail types, it makes a real difference.
What the Research and Industry Actually Says
I want to be transparent about something: the nail industry relies heavily on practitioner knowledge and brand-published guidance rather than clinical research. This isn’t a criticism — it’s just the reality of a specialised trade.
That said, there are some credible external sources that inform how we think about gel nail adhesion and nail biology:
- The nail plate’s composition — primarily keratin with varying water content — is well-documented in dermatology literature. Water content affects flexibility, which directly affects how gel products adhere. (National Library of Medicine, Nail Anatomy)
- The American Academy of Dermatology acknowledges that improper gel nail removal and application are associated with nail plate damage — reinforcing why technique matters beyond aesthetics. (American Academy of Dermatology)
- The general principles of polymer adhesion — that a surface must be clean, dry, and appropriately textured for a polymer to bond effectively — apply directly to gel nail chemistry. This is basic materials science, not nail-industry lore. (ScienceDirect, Adhesion in Materials Science)
Be sceptical of very specific percentages in nail education content (“prep accounts for 80% of lifting”). These are educated practitioner estimates, not peer-reviewed data. The principles are sound; the numbers are illustrative at best.
Frequently Asked Questions About Builder Gel Lifting
Lifting within the first few days is almost always a prep or application issue — either residual skin on the nail plate, gel that touched the cuticle or sidewall skin, or insufficient curing. If it’s happening within 48–72 hours, look at gel-skin contact first. If it starts on day 3–5, prep is more likely the culprit. Check whether you’re removing dead skin from the nail plate (not just pushing the cuticle back) and whether your gel is maintaining that 1mm margin from the skin at all edges.
Yes — and this is one of the most underappreciated variables in gel retention. Natural nail oils are essentially a non-stick surface for gel adhesion. The fix isn’t complicated: thorough dehydration before application. Use a nail dehydrator or 99% isopropyl alcohol, allow it to evaporate completely, and then apply your gel immediately — don’t touch the nail plate between dehydration and gel application. For clients with persistently oily nails, an acid-free primer can help dramatically.
Not directly — but water reveals pre-existing weaknesses. If your gel is properly bonded to the nail plate, water exposure alone won’t cause lifting. What water does is accelerate the failure of a bond that was already compromised. The most common scenario: the free edge isn’t fully sealed, water gets underneath, and the gel lifts. If your gel consistently lifts after showers or handwashing, the issue is almost certainly free-edge sealing, not water sensitivity.
Cuticle-only lifting almost always points to one of two things: either there is residual dead skin on the nail plate at the cuticle area (not properly removed during prep), or the gel flooded the cuticle during application and touched skin. The cuticle area is also where nail growth creates stress over time — as the natural nail grows, it creates a leverage point at the base. If the lifting consistently starts at the cuticle around the two-week mark, nail growth stress may be the primary factor rather than prep.
Primer is a targeted solution, not a default step. For most nail types, thorough prep and dehydration is sufficient. Use an acid-free primer when your client has a history of chronic lifting despite correct prep, or when you’re working with notably oily nail plates. Acid primers provide slightly stronger adhesion but should be used with caution on thin or damaged nails. Adding primer won’t compensate for poor prep — it amplifies what’s already there, good or bad.
They look similar but have different causes. Lifting is partial separation — the gel separates from the nail plate at an edge or point, creating a gap, while the rest of the nail remains bonded. Peeling is full separation — the gel comes off in a sheet. Peeling in one piece almost always indicates an adhesion failure across the whole nail plate, most often caused by inadequate prep or a chemical incompatibility between the gel and whatever was on the nail surface. Lifting is usually localised and structural; peeling is usually systemic and adhesion-based.
Single-nail lifting is very informative. It usually means the nail itself has a specific characteristic that other nails don’t: it might be more flexible (ring finger is often the most flexible), it might have a different shape that makes cuticle removal harder (a pronounced C-curve), or it might be in a position that makes thorough curing more difficult (thumbs, or nails that don’t sit flat in the lamp). Identify what’s unique about that nail and address it specifically rather than changing your whole approach.
The Bottom Line on Builder Gel Lifting
After years of working with clients who’ve cycled through different technicians, different products, and different techniques trying to solve their lifting — the pattern I see is always the same. Lifting isn’t treated as the diagnostic problem it is. It’s treated as a nuisance to be worked around.
The moment you start asking “where is it lifting, and when does it start?” instead of “how do I stop lifting in general?”, the solution becomes much clearer. Location tells you the cause. The cause tells you the fix.
If you’re still troubleshooting after working through everything in this guide, the articles below go deeper into specific lifting scenarios. Each one was written with real clients in mind — not theory.