This article contains affiliate links. As an Amazon Associate, we earn from qualifying purchases at no additional cost to you.
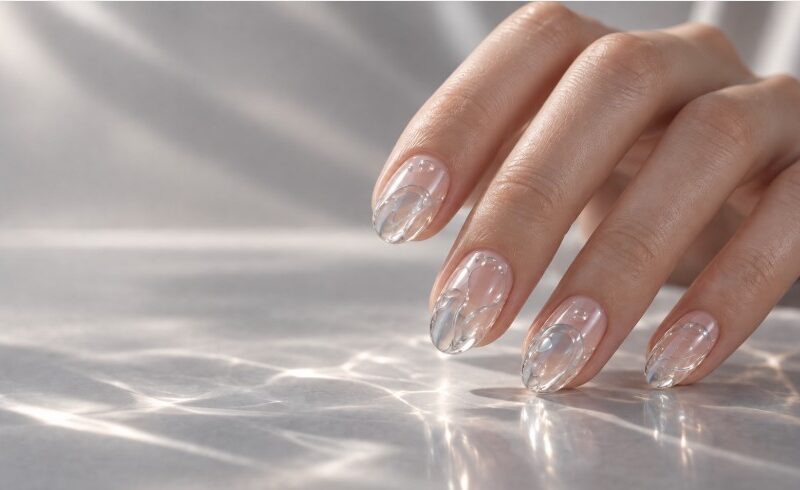
Blown glass nails are a sculpted look in which clear or lightly tinted hard builder gel is shaped into raised, rounded ridges so the nail catches light the way hand-blown glassware does. The dimension comes from the gel itself, not from a topper or a chrome powder, which is why a thick non-self-levelling builder gel is the product that decides whether the set works.
What are blown glass nails?
Blown glass nails take their name from the way molten glass is shaped by breath rather than by a mould: soft, uneven curves that never quite repeat. On the nail that translates into a clear or barely tinted base with raised swirls, bubbles or ripples built on top, each one slightly different in height. Light bends through the ridges and pools underneath them, so the nail reads as though it has depth rather than a printed pattern.
The look sits next to the glass skin manicure but is not the same thing. Glass skin chases flawless flat transparency, and technicians achieve it with ultra-fine polishing bits and a scoop-and-lay application that keeps air out of the gel — air bubbles are treated as the enemy, and technicians avoid whipping the gel with the brush so it can self-level slowly into a crystal-clear result. Blown glass takes that same clarity and then deliberately breaks the flat surface.
Most sets keep the colour almost absent. A wash of tint at the cuticle fading to nothing at the free edge is common, partly because it hides the shadow line where the natural nail ends and the extension begins.
Why is the look trending for autumn 2026?
Two things are pushing it. The first is the wider move towards translucency: 2026’s nail story has been about texture and depth rather than bold colour, with glass, milky and sheer builder gel finishes named as the defining looks of the year. Blown glass is the sculpted end of that same conversation.
The second is that 3D is back in a way it hasn’t been since the early 2010s. Trend round-ups covering 2026 designs list blown-glass and dimensional sculpting alongside chrome as the technique upgrades of the year, and pair it with soft neutrals carrying one elevated detail rather than full maximalism. That combination — quiet base, one raised element — is precisely what blown glass delivers.
Autumn helps too. The look reads cold and jewel-like under low winter light in a way it doesn’t in July, and it layers well over the warm milky bases the season has already established. If you are picking shades for the season generally, our Autumn BIAB Nails 2026 guide covers the palette shade by shade.
Why hard builder gel and not a 3D art gel?
Product category is the usual sticking point at home. Small pots sold as “3D art gel” or “sculpture gel” are made to sit as tiny decorative shapes — flowers, bows, a single blob — and they are usually soft-gel chemistry, soak-off, and quite thin once cured. Build a full ridge across a nail with one and it flattens under its own weight before you reach the lamp.
Hard builder gel behaves differently because it is a different material. It has a non-porous, cross-linked structure that acetone cannot penetrate, so it has to be filed off rather than soaked. That same density is what lets a raised shape hold its height for three or four weeks instead of wearing flat by day five.
One trade-off to weigh before buying: removal is filing, always. If you are not comfortable with a file or an e-file, this is not the trend to start with.
Look for thixotropy on the label, or the words “does not run” and “high surface tension”. A thixotropic gel thickens when it is left alone and loosens when the brush moves it, which is the only reason a ridge stays where you put it while you finish the other four nails. Self-levelling is the opposite property, and self-levelling gels are wrong for this look no matter how clear they cure.
What to look for when choosing a gel
Viscosity, and how to read it without touching the pot
Thick gels are sold in pots with a spatula; thinner ones come in bottles with a brush. That packaging difference is a reliable shortcut. If it pours, it will not hold a ridge.
Medium viscosity is the awkward middle ground. It is easier to work with than a stiff pot gel, but it needs a short flash cure between each element, following the flash cure time your gel manufacturer gives, and beginners tend to skip that step and end up with a slumped shape they then have to file off entirely.
Clarity after cure, not in the pot
Almost every clear builder gel looks clear in the pot. The test is what happens under a lamp: some cure with a faint yellow cast, and on a design built entirely on transparency that cast is visible from across a room. Yellowing is most common in older UV-only formulas and in gels that have been stored in light.
Non-yellowing is usually stated on the label when a brand has bothered to formulate for it. If it isn’t stated, it is worth checking the manufacturer’s product information rather than assuming.
Lamp compatibility
Thick gel and thin gel do not cure the same way. A raised element can be four or five times the depth of a normal builder layer, and the light has to reach the bottom of it. Look for a lamp that matches the curing requirements of the gel you have bought — many current builder gels are compatible with 365/405 nm UV/LED lamps around 48W, but the manufacturer’s specified lamp and cure time is what to follow, not the wattage number on the box.
Cure times on the pot assume a standard layer. For a built shape, cure once, then cure again after the tack layer is wiped and the topcoat is on.
HEMA content
Raised work means more product sitting closer to the skin for longer, and it means more filing. Both raise the odds of contact with uncured gel at the cuticle. HEMA-free hard gels have become widely available and are worth the small extra cost here even if you have never reacted to a standard formula.
The three tools needed for this look
You can build this look with a shorter kit than most tutorials suggest. What you cannot do is substitute around the gel — everything else has a workaround, that one does not.
The gel — the part that decides everything
IBD Hard Gel LED/UV French Xtreme Clear
A clear hard gel sold in a pot, listed for sculpting and extension work rather than as a soak-off overlay. That is the category you want for raised elements: enough body to shape a curve before flash curing, and enough density to keep that height for the life of the set.
Check the viscosity and clarity claims on the manufacturer’s own product page before buying, since these vary between hard gels in the same range. Removal is filing, not soaking.
The brushes — for placing and drawing
A five-piece liner set covering roughly 7mm to 25mm. The shortest liners are the ones that matter here — they carry a small bead and place it in one movement, which is what keeps air out of the gel. Cloudiness under a ridge cannot be fixed after curing.
The longer liners in the set are for fine line work rather than bead placement, so treat this as a set you will use two brushes from at first.
The lamp — where most home sets fail quietly
A 365/405 nm UV/LED lamp around 48W
A raised element is several times deeper than a normal builder layer, and an underpowered or single-wavelength lamp can cure the surface while leaving a soft core. That failure does not show up on the day; it shows up weeks later as a ridge that dents.
Dual-spectrum lamps at this rating — the SUNUV SUN3 is a widely sold example — cover most current builder gels. Match the lamp to the cure time and wavelength your gel manufacturer specifies rather than buying on wattage alone. If your existing lamp already meets that spec, put the money into the gel instead.
We earn a small commission from qualifying purchases through these links, at no extra cost to you. It does not change which products we recommend.
How the shape is built
The sequence is shorter than it looks, and the difficulty is in the second step rather than anywhere else.
Prep and apply a base, then build a thin clear structural layer over the whole nail and cure it fully. This is the floor everything else sits on, and it needs to be smooth — any texture underneath will read as a flaw through the clear gel above it. Prep discipline matters more here than on a coloured set, which is the same argument our nail prep guide makes for ordinary overlays.
Then pick up a small bead of thick clear gel on the tip of a detail brush and lay it down without dragging. Push it into a curve, let it sit for a few seconds so surface tension rounds the edges by itself, and flash cure. Repeat for each ridge, working one nail at a time, because gel left waiting on a brush picks up dust and warmth and stops behaving.
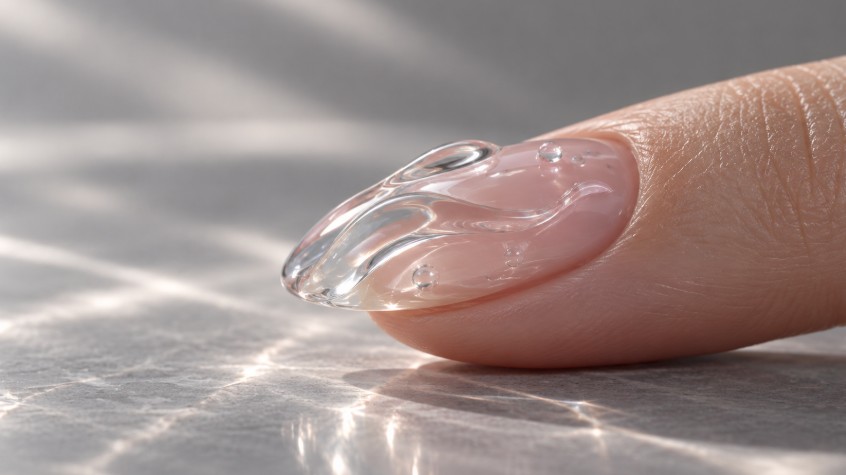
Finish with a no-wipe glossy topcoat, cured twice. Gloss is not optional on this design — a matte or satin finish kills the refraction entirely and the whole set collapses into a lumpy neutral.
Common problems and what causes them
Ridges that flatten before curing are almost always a viscosity problem rather than a technique problem. The gel is too thin, or the pot has been sitting somewhere warm — gel left near a lamp or a radiator loses body noticeably.
Cloudiness under the ridge means air. It gets in when the brush is worked back and forth in the bead instead of placing it once and leaving it, and it is very hard to fix after curing without filing the element off and rebuilding.
A ridge that lifts away from the layer beneath it usually means the structural layer was over-cured and its tack layer was too thin to bond to. Cure the base layer to spec, no longer, and never wipe it before building on top.
Cracking across a raised element is a thickness mismatch — a tall ridge on a very thin floor concentrates stress at the join. Build the floor properly before you build the art. The reasons builder gel cracks and lifts in general are covered in our complete guide to builder gel lifting, and they apply here with more force, not less.
Is it worth trying at home?
If you already do builder gel overlays confidently and own a decent lamp and a file, yes. The only genuinely new skill is bead control, and it is learnable on tip sticks in an afternoon.
If you are still learning to apply a smooth flat layer, this technique is likely to be frustrating rather than rewarding. Blown glass shows every flaw in the layer underneath because you can see straight through to it, and there is no colour to hide behind. Get the flat overlay right first and the raised work becomes a small addition rather than a separate project.
Read next
Autumn BIAB Nails 2026 — the season’s full shade story.
Nail Prep for Beginners — the step that decides whether clear gel stays clear.
Why Builder Gel Lifts — causes, and how to stop it happening again.
Frequently asked questions
Can you do blown glass nails with soft gel or BIAB?
Not properly. BIAB and soft builder gels are formulated to self-level, so a raised shape will settle flat before it cures. They work as the clear floor layer underneath, but the ridges themselves need a thick non-levelling hard gel.
How long do blown glass nails last?
Three to four weeks, the same as any hard gel overlay, provided the raised elements were flash cured individually and sealed under a full topcoat. Wear tends to show as dulled gloss rather than chipping, so a topcoat refresh at two weeks keeps the refraction sharp.
Do blown glass nails have to be clear?
No, but heavy pigment defeats the point. A sheer tint of smoke grey, pale amber or dusty blue in the base layer reads well because light still passes through the ridges. Opaque colour under a raised element just looks like a bump.
Can they be removed with acetone?
No. Hard gel is solvent resistant and must be filed down, ideally by someone comfortable with an e-file. If soak-off removal matters to you, this design is not a good fit.
What lamp do blown glass nails need?
Use the lamp and cure time your gel manufacturer specifies. Many current builder gels are compatible with 365/405 nm UV/LED lamps around 48W, but wattage alone does not guarantee a full cure — raised gel is far deeper than a normal layer, and an underpowered or single-wavelength lamp can leave a soft core that dents weeks later.